Showing posts with label Julie Daechsel. Show all posts

8 March 2018

A SHERLOCKIAN APPROACH TO CONSERVATION

CONSERVATION TIPS & TRICKS

BY: JULIE DAECHSEL

This post wouldn’t exist without Sherlock Holmes – technically, the American adaptation of London’s detective. Most viewers are familiar with the BBC’s version of Sherlock Holmes (surprisingly called Sherlock), and not the less critically acclaimed series on CBS, Elementary, starring Jonny Lee Miller as Sherlock and Lucy Liu as Dr. Joan Watson.

Benedict Cumberbatch in Sherlock versus Jonny Lee Miller in Elementary. The two actors co-starred in a stage production of "Frankenstein" in which they alternated in the roles of Dr. Frankenstein and the Creature before starring in their Sherlock series. Source.
But what does Elementary have to do with conservation? Everything, my dear Watson. I’ll try to avoid any spoilers, although the upcoming scene is a flashback so it doesn’t reveal a major plot point. So during a flashback, we see how Sherlock meets Irene Adler.


While on a case, Sherlock consults Irene, a conservator, as to whether a Turner painting is a forgery (spoiler: it is). Sherlock identifies a painting in Adler’s studio that she claims to be a copy of one she restored for a museum (surprise, it’s actually the original). The museum wanted Adler to repair damage caused by shelling in WWI by filing down the paint, an act she argued “compromised what the artist had intended”. So she made a restored copy to return to the museum and kept the original in its damaged state.

This scene stuck with me. What is the line between damage and history? I’ve written in my previous posts about the responsibility conservators have to the object’s well-being, but Irene makes an intriguing point. What constitutes damage? And what is the effect aesthetic has on conservation?

What do museum professionals do in the face of uncertainty? Research.

Case #1: Saint Andrea Corsini (1630) by Giovan Francesco Barbieri looks, well, a little morbid – but for a good reason?

Detail from Saint Andrea Corsini that shows a bullet hole. The Corsini was as prominent as the Medici family - their family crest is at the top of the Trevi Fountain. Source.
This portrait of Saint Andrea Corsini has two bullet holes as badges of honour. During WWII German soldiers attempted to steal the painting for the Führermuseum from the Corsini family in Italy in 1944. Princess Elena Corsini feared this would happen, so she had hidden smaller works from the family collection in an empty crypt. Larger works were packed in a truck and driven to Villa Le Corti, where she hid them behind a false wall, except for this painting, which she hung on the wall in the hope that her ancestor would protect the artworks. German soldiers noticed the still-wet plaster but in the face of advancing Allied troops, couldn’t examine it further and shot the painting in frustration.

After the war, the Corsini family decided not to restore the work to serve as a reminder of the ravages of the war on both humanity and art.

Case #2: The Sistine Chapel is clean, but was that Michelangelo’s intention?

The Sistine Chapel ceiling post-restoration. Source.
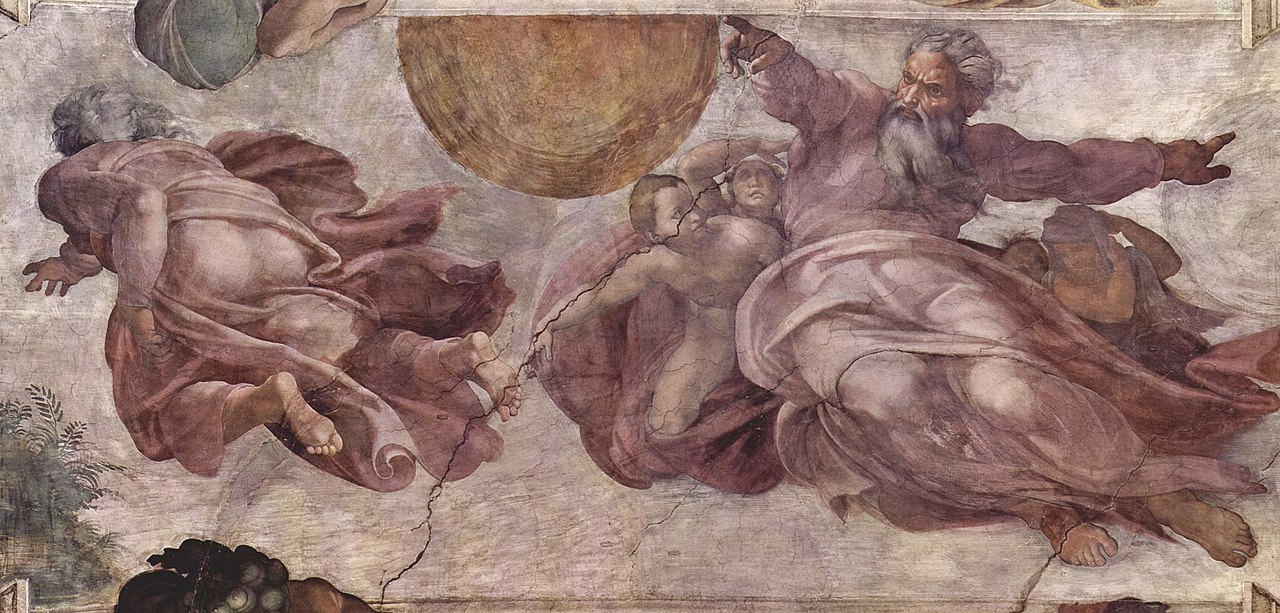
The Creation of the Sun, Moon and Vegetation from the image above, pre-restoration. Source.
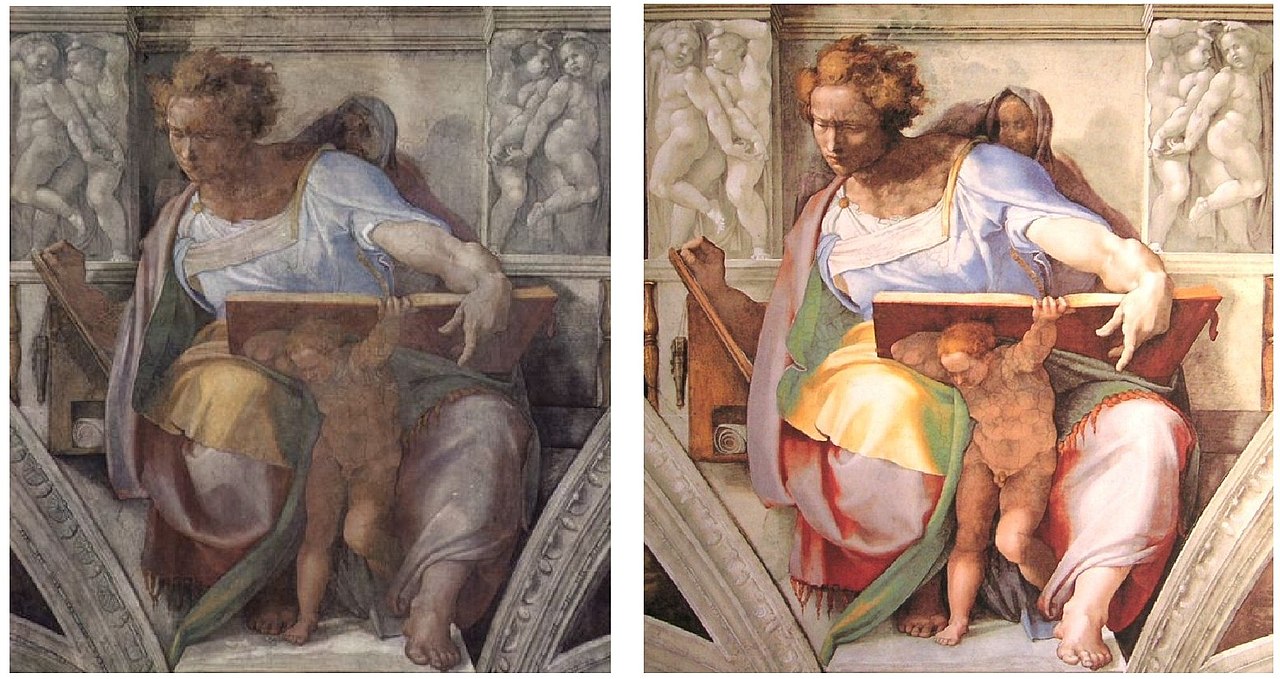
In the 1980s and 1990s, the Sistine Chapel underwent a cleaning to remove centuries of dust and candle soot. Critics feared that the cleaning process might damage the masterpieces, while some argued that visible age was part of the art. After the cleaning, people marvelled at the brighter colours and declared that the Michelangelo’s “true” masterpiece was revealed. But the cleaning, while removing dirt, had lifted away certain details and shadows (some to the extent of removing pupils from the eyes of figures). Any details that were added on top of the fresco, whether by Michelangelo or other artists, were removed.

Detail from Daniel. On the unrestored fresco, the red underpainting shows through the black a secco wash adding luminesce to the shadows. The form under the garment is achieved by the black wash which was removed during the restoration. Source.
While the colours were brighter, critics argued that the compositions were flatter and modelling on figures seemed cruder as shadows Michelangelo had intentionally painted were accidentally removed. As Michael Daley of ArtWatch noted, restorers removed layers of varnish Michelangelo had deliberately applied in order to harmonize and tone down his colours. Moreover, stripping these varnishes exposed the fresco surfaces to atmospheric pollution.

Now what?

Source.
We have an example from each group of thought. The Corsini family thought like Adler, that the painting’s damage added to its aesthetic: that its physical change enhanced the work’s intended meaning. In contrast, the Sistine Chapel restoration removed what was perceived as dirt and damage to reveal stunningly bright colours. But both actions have consequences. Saint Andrea Corsini will forever be known as the painting with a bullet through the head of a saint. The Sistine Chapel sacrificed arguable intention darkening varnishes and overpainting on the fresco.

If these posts have proven anything, it’s that conservation is much more complex than wiping off dust and rust. It’s knowing how to care for an object, and more importantly, when to. It’s knowing the difference between help and harm. But most importantly, it’s recognizing the consequences, permanent or impermanent, of our actions. Sometimes the hardest choice is not action but passivity. And sometimes it’s vice versa.

8 February 2018

CONSERVATION CAUTION: WHEN BAD CONSERVATION HAPPENS TO GOOD ARTIFACTS

CONSERVATION TIPS & TRICKS

BY: JULIE DAECHSEL

Conservation is a task that can strike fear into the hearts of public history professionals as with one false step history is destroyed. Conservation is a high stakes game: scrub at some rust a little too hard, polish some metal too vigorously, or over-saturate a cotton swab and suddenly you’ve caused damage. Sometimes this damage is reversible or at least repairable. But there are rare occasions when even the experts make mistakes and forever change an artifact or masterpiece.

When such mistakes are made in the public area, the scrutiny can be relentless (and also hilarious). They say the road to hell is paved with good intentions. Here are some pit stops along the way:

1. Ecce Homo

The original fresco (left) versus the restoration (right). Source.
What Is It: A 1930s fresco portrait of a solemn Jesus by Elias Garcia Martinez, a Zaragoza art professor.

Where: Sanctuary of Our Lady of Mercy in Borja, Spain.

The Conservation: In 2012, local resident and amateur artist Cecilia Giménez attempted to fix the flaking and faded fresco.

The Controversy: Saying this was an attempted restoration is a bit of a stretch. Giménez was raked over the coals by local press and made international headlines as the pensioner who turned Jesus into a monkey (there is something marsupial about the painting’s features). Ecce Homo was mocked and parodied to no end on late night television:

Cecilia Giménez, as portrayed by Kate McKinnon, on Saturday Night Live. The character became a regular on "Weekend Update" whenever a poorly made statue of a celebrity was unveiled (Lucille Ball, Cristiano Ronaldo). Source.
But this is the rare instance in which a botched conservation job had a positive impact, as visitors flocked to Borja to see Giménez’s Jesus and actually saved the local economy during a recession. Another little known fact is that Giménez hadn’t completed her work before the press intervened (although some question just how much better the fresco could have gotten). The New York Times wrote a follow-up article on the impact of Ecce Homo, here.

2. Ocakli Ada Castle

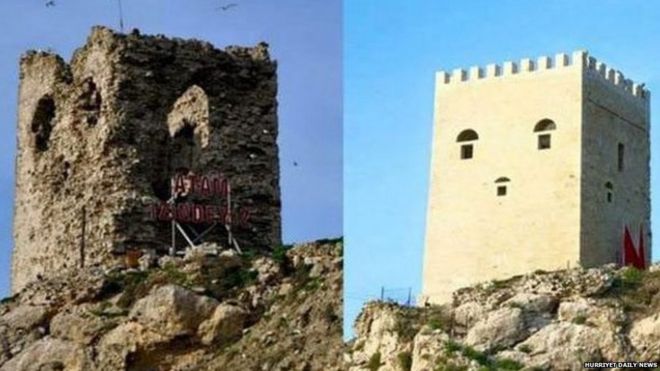
The castle before restoration (left) and after (right). Source.
What Is It: A restored fortress of the Byzantine era in Turkey that has earned the nickname “SpongeBob Castle” due to its resemblance to the cartoon character.

Where: Sile, Turkey

The Conservation: The fortress has suffered from neglect since the nineteenth century, spurring the town in 2010 to mitigate the existing damage and restore as much of the site as possible.

The Controversy: The renovations have resulted in a monument that looks brand new as new stone has replaced or covers almost all of the original stone. The awkward placement of windows has given the appearance of a face and turned a historic site into a comical castle.

3. Burial Mask of King Tutankhamun

The mask before the first attempted repair. Source.
What Is It: In 2014, the beard on the gold burial mask of Tutankhamun (c. 1323 BCE) was knocked off by a museum employee during lighting adjustments. 

Where: Egyptian Museum, Cairo, Egypt

The Conservation: “Conservation” is a bit of a overstatement, as the museum’s response was to hastily glue the beard back on with epoxy.

The initial repair. Notice the thick layer of epoxy and scratches on the chin. Source.
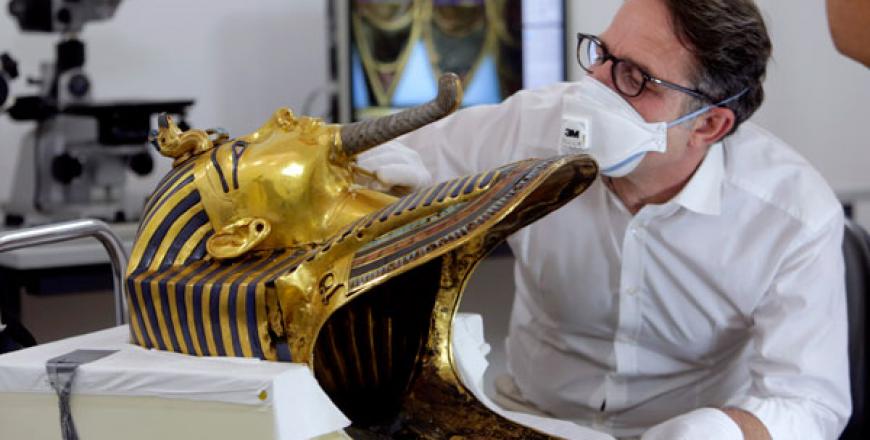
The Controversy: The repair job has led to the involved employees facing trial after prosecutors deemed their work so terribly botched that it was negligent and violated professional standards. Prosecutors claimed the workers attempted to cover up their mistakes on three subsequent occasions. This is not the first time the beard has been repaired, as it was discovered completely broken off the mask in 1922 and reattached in 1946 using soft solder. A team took nine weeks to restore the mask: four weeks alone was spent slowly heating the epoxy and gently scraping it off with wooden sticks. The team reattached the beard using beeswax, a material common in Ancient Egypt and non-damaging to the mask: read more here.

The restoration in progress. All of the epoxy was removed. Source.
4. Qing Dynasty Fresco


The fresco before restoration (above) and after (bottom). Source.
What Is It: A c. 1644 to 1911 (Qing Dynasty) fresco in the Yunjie Temple.

Where: Liaoning province

The Conservation: A team was brought in to prevent further deterioration and restore existing damage.

The Controversy: The conservation team repainted the entire fresco rather than repairing the damage. Their work vastly differed from the style of the original fresco. Chaoyang, the city responsible for the temple, claimed the project was unauthorized and halted any further progress.

5. Supper at Emmaus


Pay attention to the woman on the right holding the baby. Her face will soon change. Source.
Where: Louvre Museum

What Is It: A 1559 by Veronese painting depicting Christ meeting the pilgrims on the road to Emmaus.

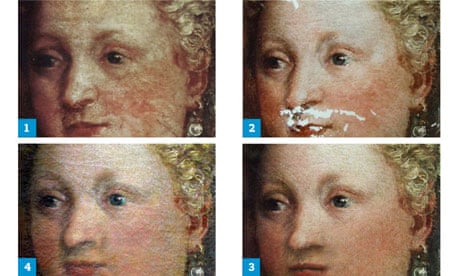
The Conservation: The painting was cleaned and retouched by restorers in recent years on at least two occasions.

1) The original painting with the nose turning down. 2) Previous "repaints" are removed. 3) After the first restoration the nose and mouth have changed shape. 4) The second attempt tries to repair previous errors. Source.
The Controversy: This is an instance of not just restoration but retouching, as the nose on one of the subjects in the painting was blatantly repainted to reflect the restorers’ perception of Renaissance beauty. As Michel Favre-Felix, president of the Association for the Respect and Integrity of Artistic Heritage (Aripa) in Paris, said: “Veronese had pictured a noble family mother, as an echo to the Virgin Mary, and it has been turned into a caricature of a 21st-century adolescent, with bloated cheeks and a ridiculous pout”. Specifically, the nose and lips have been altered. It came to light that after criticisms of the first repaint appeared in the press, the Louvre repainted it again but without recording this second restoration. The restoration team not only cleaned but removed paint and repainted facial features.

Source.
Some examples are genuine efforts to do good gone wrong, some are the ill-effects of putting power in the hands of those unprepared to wield it, and others are blatant attempts at alteration. In the immortal words of Winston Churchill (and paraphrased by Spiderman), “Where there is great power there is great responsibility”. Conservators must balance their ability to restore with their duty of care.

7 December 2017

DUST, RUST, AND ALL THE REST: SPECIAL HOLIDAY EDITION

CONSERVATION TIPS & TRICKS

BY: JULIE DAECHSEL

Surprise! "Dust, Rust, and All the Rest" is back for one last edition. This post is dedicated to the Royal Ontario Museum’s iconic totem poles.

The holidays are nearly upon us, and for some this means hanging out with friends, entertaining visiting family, or relaxing after the marathon known as final term assignments. All three activities can quite nicely be enjoyed at the ROM – and while you’re there, you can wow your guests (or yourself) with some historical and conservationist facts about the famous ROM totem poles.

Like all great stories, this one begins over one hundred years ago when Bill 138 passed on April 16, 1912. This bill officially created the Royal Ontario Museum, yet the University of Toronto, who first proposed a museum in Toronto, had been collecting objects for a museum long before this legislation. The university tasked Charles Trick Currelly, a graduate of Victoria College and self-taught archaeologist, with filling their proposed museum, which he did with unmatched vigor and passion. 

Charles Trick Currelly. Source.
In the spring of 1913, as the administration and management plans for the new museum were being finalized, Currelly was sent out on a lecture tour. By all accounts, Currelly was a tad overenthusiastic and this series was intended to keep him from meddling. In British Columbia, he was intrigued by the craftsmanship of the west coast people. Through Canadian anthropologist Marius Barbeau, Currelly purchased three totem poles for the museum.

It is important to contextualize this purchase as it occurred during the Indian Act, under which the potlatch ban criminalized the creation of Indigenous ceremonial and cultural art. There was a mad rush to acquire (although in some instance “seize” might be more appropriate) Indigenous objects and art. A fourth totem pole was collected by British medical doctor and hobbyist ethnographer Charles Newcombe in the 1920s.

Transporting artifacts is a test of ingenuity and planning. Transporting totem poles, the tallest of which was twenty-four metres, from British Columbia to Toronto is a logistical nightmare. The poles were floated down the Portland Canal to the ocean, then towed to Prince Rupert. The largest pole was cut into three sections while afloat before it could be loaded into a railway car. 

The Portland Canal to Stewart, BC. Source.
All of this work was almost for nothing, as there was no room in the original museum for the totem poles. They could be erected outside the building, but Currelly had been told that they wouldn’t last for more than one hundred years outdoors. What follows is perhaps the greatest example of collections management-obsession ever.

A hundred years sounds like a long time to most. But remember when I said that Currelly was obsessively passionate about his museum? A hundred years wasn’t good enough (especially when people were certain that Indigenous craftsmanship would end). Currelly was so certain that the museum would warrant an expansion in the upcoming years that he decided to preserve and store the totem poles until they had a home inside.

By no means a conservator, really by any standards, Currelly remembered his time at dig sites and the unconventional methods of artifact handling to create a preservation method. He soaked the poles in petroleum until they were completely saturated, then poured gallons of floor wax over them. Finally, they were wrapped in protective bandages and burlap then lain outside the museum until a new wing was built in 1933 with a specially designed area to display the poles (fun fact: this is the Queen’s Park wing with the old entrance the will be reopened). Incredibly, the totem poles were perfectly preserved after more than a decade outside.

Now they sit in the two stairwells off the Rotunda, still preserved after more than one hundred years. But there was a casualty of Currelly’s conservation treatment: the petroleum oil destroyed the original paint decorations. Otherwise, the totem poles are in great condition.

The totem poles in their specially crafted home. Source.
By displaying the totem poles inside, there are fewer conservation dangers: the CCI Notes for indoor totem poles only warns about the wood cracking, as red cedar is a moist wood that splits as the moisture evaporates after logging.

The poles should be dusted infrequently to prevent uneven polishing or abrasion. When dusting is needed, use a vacuum with a long-haired attachment, as Rick Mercer did at the Canadian Museum of History.


This is officially the last Conservation Tips and Tricks post of 2017. Hopefully on your next visit to the ROM you’ll see the totem poles in a new light. Happy Holidays!

Further Reading:

Dickson, Lovat. The Museum Makers: The Story of the Royal Ontario Museum. Canada: The Bryant Press, 1986.

Horrill, Mallory. "81 Years in a Museum". Musings. October 2, 2014.

Kenter, Peter. "Work of indigenous builders lives on in ROM totem poles". Daily Commercial News. July 28, 2016.

9 November 2017

DUST, RUST, AND ALL THE REST: PART TWO

CONSERVATION TIPS & TRICKS

BY: JULIE DAECHSEL

Welcome to part two of “Dust, Rust, and All the Rest”. For those of you who missed part one, it can be found here. This final installment will recount the epic saga of Julie vs. the Cow Hair Trimmer, aka my first foray into conservation. During my time this summer as a Curatorial Collections Assistant at the Markham Museum, Janet Reid, the curator, arranged for conservator Miriam Harris (Professor of Cultural Heritage Conservation and Management at Fleming College) to lead a one-day conservation boot camp.

But what does a cow hair trimmer have to do with this? The short answer: it is a challenge I bested. The long (and less conceited) answer: Geared for Growing.

Source.
Geared for Growing is the current exhibition at the Markham Museum and showcases innovations in farming. In the museum’s teaching collection is a cow hair trimmer: a device that uses a hank crank to power a hair trimmer.

Colour me surprised when Janet told me she wanted it in the upcoming (now current) exhibition. I’m assuming this shock showed on my face as she told me that since dairy farms have to be extremely hygienic cows need regular haircuts. How does a farmer achieve this standard? A cow hair trimmer.

For a device that promotes cleanliness and hygiene, it could not be more disgusting. It was caked with dirt, rust, and cobwebs.

Photo courtesy of Julie Daechsel.
We brought the trimmer to the curatorial department and the conservation gauntlet was thrown down. Somewhere beneath the grime was a fantastic teaching object: I just had to find it.

In the curatorial armour (aka a lab coat and gloves), I used the first weapon in my arsenal: a vacuum cleaner. BOOM – the cobwebs were gone (and so was the spider that crawled out). With a dry brush, I brushed as much dirt and dust into the vacuum attachment.

The various brushes in a conservator's toolkit. Source.
Next came makeup sponges. The miraculous power of makeup sponges should never be underestimated: porous yet strong, these little wonders are dirt magnets (and cheap too). The trick is to gently sweep them over a surface – try not to rub or scrub as this can potentially damage the object and causes the sponge to deteriorate. And because they are cheap, use as many as you need – dispose of a sponge as soon as it gets dirty or you’ll be spreading that dirt back onto the object. Also, sometimes surfaces need to be cleaned with sponges more than one time – keep cleaning this way until the sponge comes back clean.

Makeup sponges. Prepare yourself for a enormous pile of dirty ones. Source.
To my great surprise (and eventual disgust), what I thought was painted metal turned out to be caked on grime. This grime was a lovely mixture of grease, dirt, cow hair, and what smelled like cow sweat. Once I numbed myself to the smell, scrapping this gunk out became really fun. Using scrapers and picks of various sizes, I eventually de-gunked the trimmer.

Some scrapers. Source.

At this point, the trimmer was no longer disgustingly dirty or smelly. But the rust was not attractive. After cleaning my picks and scrapers, I attacked the rust. Most of the rust was on the trimmer attachment.

The trimmer attachment. It was already broken when I got it, I swear. Photo courtesy of Julie Daechsel.
Usually, it is not suggested to take apart what you are cleaning for two reasons: one, you may not know how to put it back together; and two, once the rust is removed, the pieces may not fit back together. The voice of experience (Janet) gave me the all-clear to remove the screw that held the blades together.

The trimmer blades after being removed from the trimmer. Photo courtesy of Julie Daechsel.
I happily spent days scraping active rust (orangey-brown rust) off the trimmer (it’s not weird that this was extremely satisfying, right?). Don’t even get me started on the rush I felt after scrubbing it with heavy duty scouring pads and fine grit sandpaper.

These were super fun to use. Source.
If I thought old cow sweat was smelly, it ain’t got nothing on mineral spirits. A word to the wise: wear a mask! It removes rust but at the cost of your sense of smell.

And ta-da! The beauty beneath the grime was revealed!


No more rust! Photo courtesy of Julie Daechsel.
Lessons Learned:

· Brush and vac: boring, but effective. Contain your excitement at the sight of a rusty object and take the time to dry brush and vacuum it first.

· Horde makeup sponges: incredibly effective and easy to use. Just change your sponge frequently!

· Scrapers and picks: never try this without permission. Any cleaning beyond light dirt removal requires permission from an experienced conservator. Play with different shapes and sizes to find the one with the perfect angle.

· Mineral spirits (aka paint thinner): removes nearly everything, which can be problematic. Remember, it will remove paint as well so avoid using it on certain surfaces.

· Lee Valley is a conservation goldmine

If you are nervous about conservation, practice on a less valuable object. A great way to dip your toe in the waters of conservation is to try cleaning a demo/teaching collection object: the stakes are much lower.

Finally in the exhibition! Photo courtesy of  Julie Daechsel.
Source.
Thanks for tuning in! 

12 October 2017

DUST, RUST, AND ALL THE REST: PART ONE

CONSERVATION TIPS & TRICKS

BY JULIE DAECHSEL

I love dust. I love rust. I love grime.

Source.
Before you question my sanity and scroll past this post, I let me explain – I love cleaning these things off an object. In this two part series, I’ll outline a practical beginner’s guide to conservation. By using stories from my time in the Markham Museum’s curatorial department, I’ll show you how to defeat dust, rust, and all the gross grime that attacks artifacts.

Part one will look at planning your war on dirt and part two will show you how to execute your plan and annihilate your foes.

Why conserve?
Removing layers of dirt and neglect from an object is insanely satisfying, and not just for the conservator. To the object, conservation is life or death (seriously): surface dirt and grime promotes deterioration, interferes with the aesthetics and the interpretation of an object, and attracts pests.

I think most people are more frightened of conservation than they should be. I’ll take this moment to clarify what I mean by “conservation” – it is by no means restoring an object to perfection. Cleaning an object doesn’t mean taking the object back to its original state: it means preventing further deterioration.

Definitely not the kind of cleaning I mean. Source.
Before cleaning, ask yourself...

Is it required? Does the object need to be cleaned?
Look at the object itself and how the museum (or entity that owns the object) wants to use it. If the object’s purpose depends on it being hygienic, then a deeper clean makes sense. Case in point: the curator of the Markham Museum, Janet Reid, restored a brass and chrome Babcock tester by removing layers of oxidation. Her goal was to clean it to a level appropriate for "Dairy Testing Clean", as it was a dairy testing tool. In consultation with Miriam Harris, Professor of Cultural Heritage Conservation and Management at Fleming College, it was determined that certain mechanical cleaners would be safe for both object and conservator.


Babcock tester from the Markham Museum after being restored. Layers of green corrosion were removed. Photo courtesy of Anna Kawecka.
The tester is now fully functioning as the corrosion was removed from all surfaces. Photo courtesy of Anna Kawecka.
What is a reasonable level of clean?
Determine how dirty the object is and what resources are available to you. Conservation is a lengthy and expensive process. So how do you balance the needs of the object with limited resources?
Triage the object: identify areas that need immediate attention (those that put the object in danger of irreversible damage) and areas that are not hazardous but not ideal. Figure out how much time and how many resources you can devote to the object. From there, it’s a matter of making a plan: the entire object needs to be brought to a uniform level of clean.

At the museum, Janet Reid wanted to add a cast iron horseshoe to an exhibition. Two hours were devoted during a busy exhibition installation to improve the appearance of this horseshoe (which was to be added to the upcoming exhibition) and stop the active corrosion. From a compromise between curatorial goals and conservation ideals, the horseshoe was taken from this:

Pretty gross, right? Photo courtesy of Julie Daechsel.


To this:

Two hours of conservation work. Photo courtesy of Julie Daechsel. 
Notice how it is uniformly clean? Equal amounts of time were spent cleaning every surface.

What is the dirt? How should it be removed?
Without intensive curatorial training, it’s next to impossible to look at an object and diagnose its dirt. Never blindly guess what dirt or corrosion is on your object: make an educated guess.

Look at where the object acquired its grime: was it outside, in a barn, in a basement? Could the grime be dirt, dust, or a combination? What is the object made of? When in doubt, ask other museum professionals: send a picture to the OMA listserv and wait for the responses to pour in. Museum professional love to share their wisdom and are only an email away. If you’ve identified the material, consult the CCI Notes before drafting your plan of attack.


Source.
But remember, never clean something without express permission from the object’s owner and never touch an object without complete confidence. Even the smallest inkling of uncertainty should give you pause.

Tune in to part two where I get down to the brass tacks (pun intended) of actually cleaning!